| Back | Table of Contents | Next |
|---|
Forges
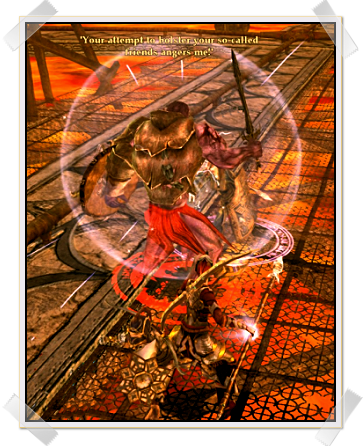
"Your attempt to bolster your so-called friends angers me!"
The Forges of Khaza-dûm is the 2nd Hard Mode to be mastered in line of all the HM instances. It is known for its well-choregraphed fight on the final Boss, Kranklûk.
The quest bestower is Eilíefr, whom you've met before. Eilíefr is found at the same place you last saw him: the 21st Hall. He will send you to Raf, who is found at Anazârmkhem on the entrance border to The Flaming Deeps. Once there, pick up any quests you may need and then grab a taxi to Rotting Cellar and jump off at the intersection known as The Crossroads of Ash (15.8s, 109.7w) or run there. Your choice. There is a campfire to the south at 16.3s, 109.6w and a summoning horn is in place. The Forges is a bit further south, 17.0s, 109.8w; up the stairs and on the right-hand side of the deadend plaza.
This Hard Mode is activated by killing the first boss, Narkû. When he dies your fellowship has a 30 minute window in which to complete HM.
Necessary Party Members:
Lore-Master - You'll need one of your friendly neighbourhood LM's with you for this place; do not leave home without one.
Trash to the First Boss:
OK, everyone's favourite part of any HM...the trash. Upon entering you'll see a group of 4 orcs over to your left and right. We're ignoring those on the right entirely, we don't need them for HM. The mob on the left consists of:
- Ghâsh-hai Guard - Big fella with 16k health
- 2x Ghâsh-hai Warriors - Smaller fellas with less health
- 1x Ghâsh-hai Archer - Guy with a bow
My favourite way to deal with these guys is for the LM to sleep-pull the Ghâsh-hai Archer. The tank picks up the 3 meleers, and DPS takes down the 2x Ghâsh-hai Warriors and then the Ghâsh-hai Guard, and finally the Ghâsh-hai Archer.
The next pull is a group of:
- 2x Ghâsh-hai Warriors - Tank and spank
- 3x Ghâsh-hai Sappers - Low health,
 but they lay down fire everywhere. Don't stand in the fire, mm-kay?
The favourite tactic here is for the ML to root-pull and then stun 1 of the Ghâsh-hai Warriors; the DPS nukes the Ghâsh-hai Sappers asap, being careful to avoid anyt fire they lay down. Then the 2 Ghâsh-hai Warriors are tanked by your Guardian/Warden and you smack them down.
Now this next batch is a little more complicated. In the center of the tunnel you'll see a Ghâsh-hai Guard who has a green health bar at the moment, and a glowing keg of black powder. What you can't see are the 4 Ghâsh-hai Sappers just out of your Line-Of-Sight. They're at the back of the nook which the Ghâsh-hai Guard is facing. Hidden by the large column is another group of 3-4 Ghâsh-hai Sappers on the far right of the room. You will be fighting in approximately the same area where the mob you just disposed of stood. The fight starts with a tank pull of the Ghâsh-hai Sappers. Your LM needs to stun the Ghâsh-hai Guard as soon as his health turns red and he rushes in join the fight. Kill the first batch of Ghâsh-hai Sappers and then move on to the second group to the far right. Do not awaken the Ghâsh-hai Guard till all of the Sappers are dead.
Ok, with the Sappers dead you can now kill the Ghâsh-hai Guard, however, as soon as he dies you need to have 2 preselected party members pick up a powder keg and run to one of the 2 gates at the left-hand and right-hand sides of the tunnel. The reason you need to do this, is another group of Ghâsh-hai Warriors and Ghâsh-hai Sappers spawn from each of the side tunnels and will keep coming until the tunnels are collapsed. With the tuneels closed you can move on to the first boss, Narkû.
Trolls & Tracks: As you enter the first boss room you will notice a series of railroad tracks and trolls. These trolls can't be targeted and will ignore you. However, if you are on the tracks you are in danger of being run over, taking 600-ish points of damage and getting stunned. If this happens in a boss fight and you are unlucky enough to then get fire on you, say goodnight. Do not fight on the tracks during boss fights!
![]() Water Pouches: Many of the mobs here in the Forges drop Water Pouches, these items are crucial for the 2nd and 3rd bosses, which will put a nast flame Damage-over-Time on you which can only be removed with these pouches.
Make sure everyone in your party has a few.
Water Pouches: Many of the mobs here in the Forges drop Water Pouches, these items are crucial for the 2nd and 3rd bosses, which will put a nast flame Damage-over-Time on you which can only be removed with these pouches.
Make sure everyone in your party has a few.
First Boss: Narkû
This guy is just annoying.
He starts off right in front of a pillar in the middle.
![]() See that Ghâsh-hai Sapper on the top of the pillar?
He drops fire onto the landing; don't stand in it or you will die!
See that Ghâsh-hai Sapper on the top of the pillar?
He drops fire onto the landing; don't stand in it or you will die!
At the back of the landing, on the left-hand side and on the right-hand side, you will see 2 rock blockades. When Narkû's morale is at 48K (left) and again at 28K (right) those rocks will break and you'll need to face:
- 1x Ghâsh-hai Warrior
- 3x Ghâsh-hai Sappers
Stun the Ghâsh-hai Warrior to give your DPS some breathing room to deal with the Ghâsh-hai Sappers.
The boss himself only has 1 ability that you need to watch for.
At random points in the fight he will call out:
![]() "You Beg for too much of my attention, (your name here)!"
The person who he names needs to run around the pillar in the middle until they are out of his LoS.
Failure to do so results in a very nasty 2k hit, which if you have not been dodging the fires swiftly enough, will result in your imminent demise.
"You Beg for too much of my attention, (your name here)!"
The person who he names needs to run around the pillar in the middle until they are out of his LoS.
Failure to do so results in a very nasty 2k hit, which if you have not been dodging the fires swiftly enough, will result in your imminent demise.
The best tactic is to have your tank keep Narkû relatively close to where he begins, with the healer concentrating on keeping everyone's favourite tank topped off. Your DPS team need to take care of the 2 waves of adds that break through the rock blockades. A Captain or Rune-keepers can come in handy here, as their ambient Heal-Over-Times are enough to keep the DPS crew topped whilst the tank deals with Narkû.
Once the adds are down, take out the boss. HM is activated when you kill the first boss, you now have 30 minutes to down the last boss to successfully complete HM.
Second Boss: Dhaub
Take the left ramp to go down to the 2nd boss. When you reach his area you'll see 4 pylons with a goblin on top of the platform; that gobblin is Dhaub. There are a series of troll tracks that run around the area, make sure you head down the ramp and stay on the tracks. Veer left or right onto the boss's lower area and wait for your party. There is a rock-slide that will trap anyone on the outside who is not in the fight area and they will be unable to join the rest of FS for this battle.
Before I go on to explain how to actually activate the boss there needs to be a quick explanation as to what "Phase 1" will consist of. There are two prmary groups here:
- Keg-runner
- Everybody Else
The Keg-runner I'll explain below: for everyone else there are a series of mobs that will come from the tunnels around the arena. You'll fight a Ghâsh-hai Warrior and Ghâsh-hai Skirmisher first from tunnel tracks #1. The LM should stun the Ghâsh-hai Skirmisher while it is still on the tracks of tunnel #1 and keep the Skirmisher stunned until the Warrior is dead. While 'Everybody Else' is fighting the Ghâsh-hai Warrior,then the Ghâsh-hai Skirmisher, both of whom will be joined occassionally by Ghâsh-hai Sappers (from tunnel tracks 2 & 3). The Ghâsh-hai Sappers which will run around and toss down fire which causes some serious damage and can cause a wipe if you aren't paying attention so get rid of them right away.
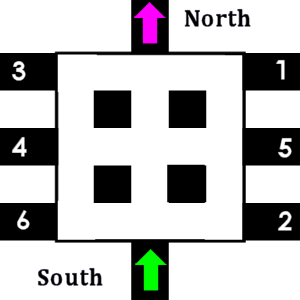
Now for the Keg-runner. There are a series of powder kegs along the pylon bases, and there are 3 tunnel tracks to the east and west side of the platform. You will need to close these tunnels off in order to trigger the boss and to stop the constant stream of both Ghâsh-hai Sappers and train-trolls. The sequence used is numbered on the map above.
NOTE: Prior to closing tunnel track #3, the Keg-runner should let party know so that your LM will be in position to be ready to stun the first fighting troll as it is spawns on tunnel track #4 In order too make this closure of the tunnels as smooth as possible, it's best to have a designated Keg-runner (preferably a hunter or captain, as neither of these classes play an improtant role in phase 1). Whoever is chosen should get stun immunity from the LM since there are trolls using the tunnel tracks.
Upon clossing tunnel track #3, two fighting trolls will spawn in the center tunnel tracks #4 & #5. As already mentioned, the LM stuns one and the other is dragged to the west side and kept there by the tank.
Once the tunnels are closed and the trolls controlled in their places the boss will drop down. It's imperative that Dhaub be kept away from the trolls AT ALL TIMES. The trolls will give Dhaub a buff that makes him invicible whilst near them and they, in turn, will be healed by their tiny master.
At various points in the fight Dhaub will yell out
![]() "Feel the bite of the black powder!" just before casting a massive AoE that causes a fire DoT on everyone within range.
The fire can be dispelled by Water Pouches; however the preferred method is to clobber the boss via a Champion.
In fact, it is preferable to have a Champion tank Dhaub for that very reason.
DPS him down as there is nothing special here.
Once Dhaub is dead simply clear the 2 trolls.
"Feel the bite of the black powder!" just before casting a massive AoE that causes a fire DoT on everyone within range.
The fire can be dispelled by Water Pouches; however the preferred method is to clobber the boss via a Champion.
In fact, it is preferable to have a Champion tank Dhaub for that very reason.
DPS him down as there is nothing special here.
Once Dhaub is dead simply clear the 2 trolls.
Proceed down the ramp and take a right; being careful if your computer sometimes lags then it will almost certainly happen here, and if it does, stop moving or you'll plummet over the edge.
You'll encounter a group of 3 Ghâsh-hai Warriors and 1 Ghâsh-hai Guard on the way down, slaughter these folks however you like then continue down.
Third Boss: Thrug
Once you've reached the bottom you will see the 3rd Boss on patrol across a walkway, he's a simple tank and spak with 2 exceptions.
1) The windows behind him explode and cause massive fire damage to anyone caught in the explosion's path, as such you need to fight the boss facing the windows.
This allows you to watch for the telltale flashes that precede an explosion.
2) Thrug will also yell out "Burn" on occasion and cause a fire based DoT.
Guess how to deal with that?
Yup, Water Pouch.
Once Thrug's been made short work of you can run around to the left and on to the opposite side to get ready for the final boss.
Last Boss: Kranklûk
By now you'll be running out of time and will need to get this fight done quickly. There are 2 fighting Trolls guarding the Boss at the beginning of this fight. The LM should stun one while the DPS kill the other at the spot where Kranklûk first stood. The tank will want to fight Kranklûk directly across the troll tracks from where he started. There is an anvil there so you will recognize the placement. The only thing the tank needs to be very aware of is positioning Kranklûk so that there is plenty of area for others to fight him without standing on the troll tracks.
Let the DPS crew handle the trolls and then flick over to the boss. Kranklûk sucks power like a LM from hell, so a Captain's Banner of Victory or a LM of your own is a huge help here. At various points in the fight Kranklûk's morale bar will turn green and he will run off to fetch more trolls. Deal with these as you did the first, DPS'ing them with your backs to the cliff face, as they can punt you into the lava.
When Kranklûk's at about half health he will start threatening different people with:
![]() "Do not anger me again, (your name here), or your life will be mine!"
You will see an eye appear appear above that person's head.
That person will need to run around a corner to get out of Kranklûk's LoS or be hit for 2k-ish worth of damage.
"Do not anger me again, (your name here), or your life will be mine!"
You will see an eye appear appear above that person's head.
That person will need to run around a corner to get out of Kranklûk's LoS or be hit for 2k-ish worth of damage.
When Kranklûk reaches approximately 18K morale then the final phase starts. Kranklûk will run to the corner on the North-west portion of the furnace foundations while your team runs to the North-east corner and becomes ready to kite the boss. Kranklûk will fetch 1 more Troll which needs to stunned during the entire third phase of the fight. Also, all of those nasty windows around the edge of the central furnace will start exploding in sequence.
The trick is to pull Kranklûk back far enough from each burning window so your team can DPS him, moving him slowly as each window explosion gets closer to your party. After Kranklûk dies, the timer stops, the windows stop exploding and you are free to kill the troll. Loot your new set of Rad armour - the chest piece!